There are various ways to install wordpress from your Cpanel account, you can install using autoinstaller like softaculous, fantastico and others. If you don't have or not available on your Cpanel, then you can install wordpress manually. But this time, I will post about how to install wordpress using Softaculous. All you should prepared or already available such as, Cpanel hosting account, domain name that already pointed to your hosting account, and then we are ready to install it.
1. Logged in to your Cpanel account, and you will found menu like screenshot below. Find Softaculous button under Software/Services menu like at the picture.
2. Click Softaculous button, and then you will be in menu like screenshot below. If you are not pointed like image, then you can click on theBlogs button left menu, see at read arrow.
3. The next step is click on wordpress logo, where ever you are before. And then your next screen should be like image below. To start install, click on Install button.
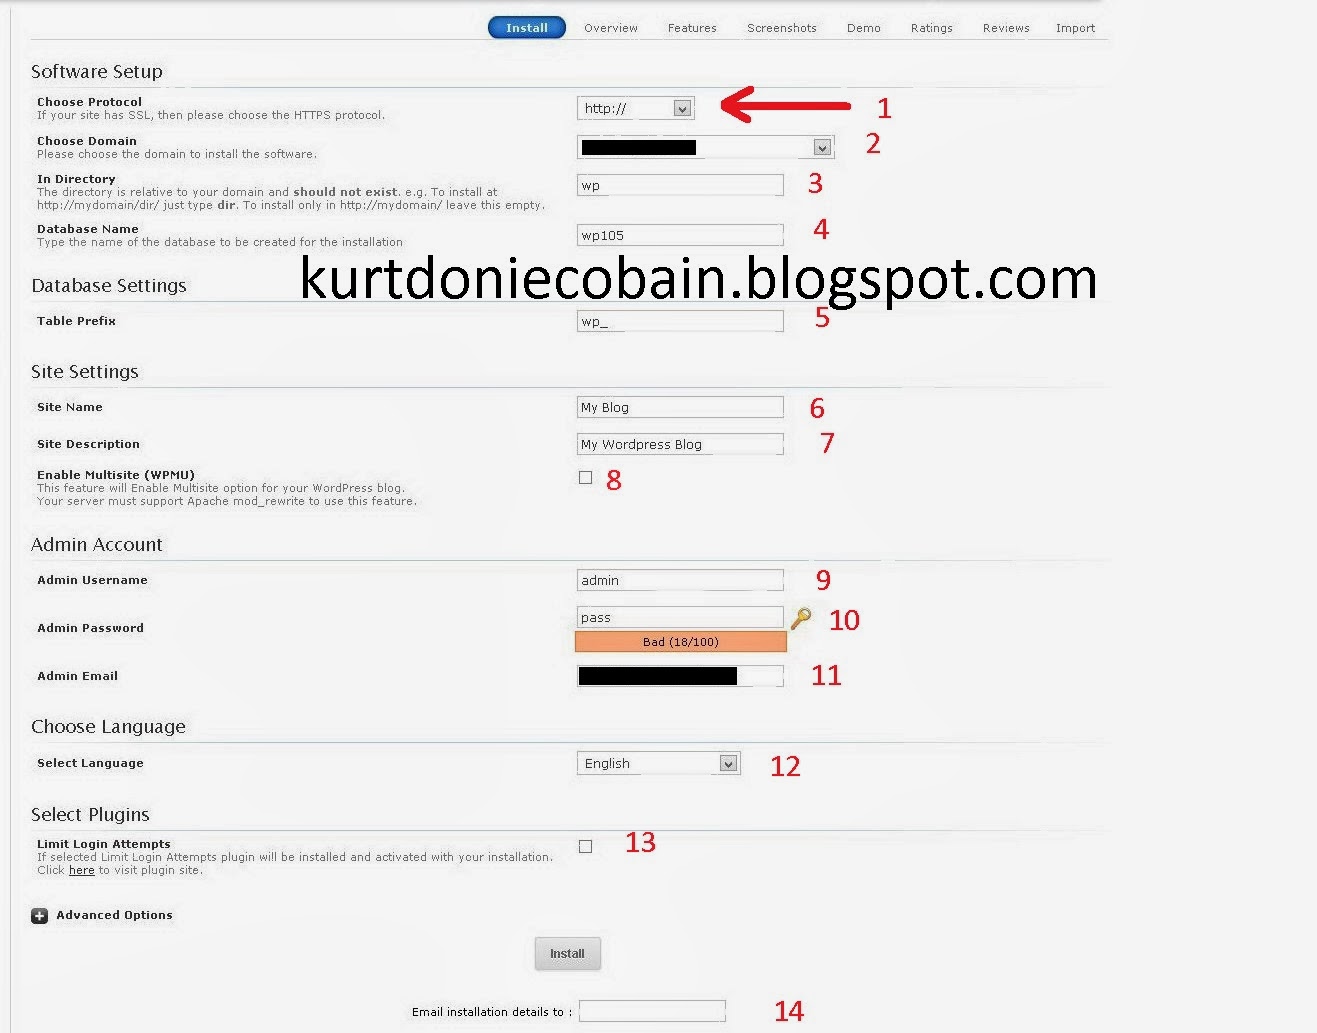
4. Follow the step based on picture below.

- Choose Protocol : In this form, you can drop down the menu to choose your domain adress using http://www or just http://. So far, I cant found the difference on performance, so its your choice.
- Choose domain : If you only have one domain, then you have no choice. If you have more than one, then you can choose your domain to install to.
- In Directory : By default, it has "wp" option on that form, if you leave it default or change it to other name, then you should access your main site to that directory eg. http://domain.com/wp. So, delete "wp", and you can access your site by typing your domain address like domain.com on your browser.
- Database name : You can leave it by default, or change into the name that you can easily remember. Because if you have more than 5 wordpress site in one hosting, and someday we need to edit your MySQL database, then we will found difficulties to define which database that the right one.
- Table Prefix : Leave it by default.
- Site name : Your site name, you can edit after installation process done.
- Site Description : Description of your site, you can also edit later.
- Enable Multisite: Let it uncheck
- Admin username : Username login to access your wordpress dashboard
- Admin Password: You know it, just a little advice. Fill with the mix of number and alphabet.
- Admin Email : Your email
- Select languange : your language
- Limit Login attempts : To avoid visitor/hacker that try to login. But remember, if you also forget your password, then it will block you also. So, if this your first wordpress installation, let it uncheck.
- Email installation details : Your email.
With 14 steps above, you almost done to installed it. After all form filled, click on install button. And if there is no problems, your insgtallation is success.
You can access or open your wordpress blog or site, by typing your domain to your browser. To access your admin dashboard type domain.com/wp-admin.